


 Title Index
 Recently Changed
 Page Hierarchy
 Incomplete
 Tags
Tags


Roster File
When we receive an email from a school needing to update their Master List. We need to request from the school a .csv (comma-separated values) file containing the following information:
- If we are registering (creating the accounts) their students – The .csv needs to have First Name, Last Name, and Student ID. Sometimes they will also provide us with Usernames and Passwords but if this is not the case then we can use a combination for username (LastName+Firstname, StudentID+Lastname, etc.) making sure that combinations always the same and for password we can usually use the word Password.
- If they want their students to register – The .csv needs to have Student ID, Last Name, First Name. No username and password are required since the students are
Adding the Roster
The roster received by the client should be saved as a CSV file and should have the following set up (Remember than when the file is saved as .csv, all formatting is removed from the spreadsheet)
IF WE ARE REGISTERING
|
Student ID |
Username |
Password |
Last Name |
First Name |
|
123456 |
DoeJane |
Password |
Doe |
Jane |
|
789012 |
DoeJohn |
Password |
Doe |
John |
IF THE SCHOOL WANTS THE STUDENTS TO REGISTER THEMSELVES
|
Student ID |
Last Name |
First Name |
|
123456 |
Doe |
Jane |
|
789012 |
Doe |
John |
The following are the directions to add the roster:
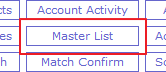
1. Go to the Account Administration page for the account, and click on the Master List feature. If no Master List appears contact Samuel Gabriel to add the feature.
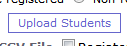
2. Click on the Upload Students button
3. In the following page check the following values
a. Account – Confirm that the accounts’ name. If the account does not appear in the drop down menu contact Samuel Gabriel so he can fix the issue.
b. Contract – Confirm that you adding roster to the correct contract, though usually the latest contract is the default selection.
c. Registration and Activation
i. If we are registering – Check both boxes for Register and/or generate usernames and Activate students after upload boxes.
ii. If the school wants the students to register themselves – Make sure both boxes are unchecked.
d. Subscription type – Always select School Based unless otherwise specified.
4. Select the file name to upload roster by clicking on the Browse button. Select the .csv file you want to upload, click on open and then the Upload button

5. Confirm that the File Field Name and the Account Field name matches as in the sample below
IF WE ARE REGISTERING
|
File Field Name |
Account Field name |
|
Student ID |
District ID |
|
Username |
Username |
|
Password |
Password |
|
First Name |
First Name |
|
Last Name |
Last Name |
IF THE SCHOOL WANTS THE STUDENTS TO REGISTER THEMSELVES
|
File Field Name |
Account Field name |
|
Student ID |
District ID |
|
First Name |
First Name |
|
Last Name |
Last Name |
Once you confirm the fields match click the Import button and wait until the roster is loaded. It may look like nothing is happening but do not click the Import button again as long as the page looks like its loading.
6. On the next page you will receive the following message
a. Success message
Jane Doe User is active updated user data.
b. Error Message
John Doe Error while updating user 789012 John Doe error was Username DoeJohn already exists in the database.
If you receive this message you can do the following. Check the username and:
i. If the information is the same - Sometimes schools will give us a roster containing students that already have accounts. If the information for this username is the same as the one in the roster file there is no need for further action.
ii. If the username is associated with another account – Usernames are unique, no two users can have the same username, thus, if the username already exists all you need to do is edit the username (i.e. DoeJohn1, DoeJohn2, Doe1John, etc.) in the .csv file and re-import the roster.
7. Once all students have been imported send an email to client confirming that the roster has been uploaded. If we registered the students make sure to provide the client with the .csv file you uploaded so they can have the students’ login information.